This post may contain affiliate links, which means that I may receive a commission if you make a purchase using these links, with NO additional cost to you.
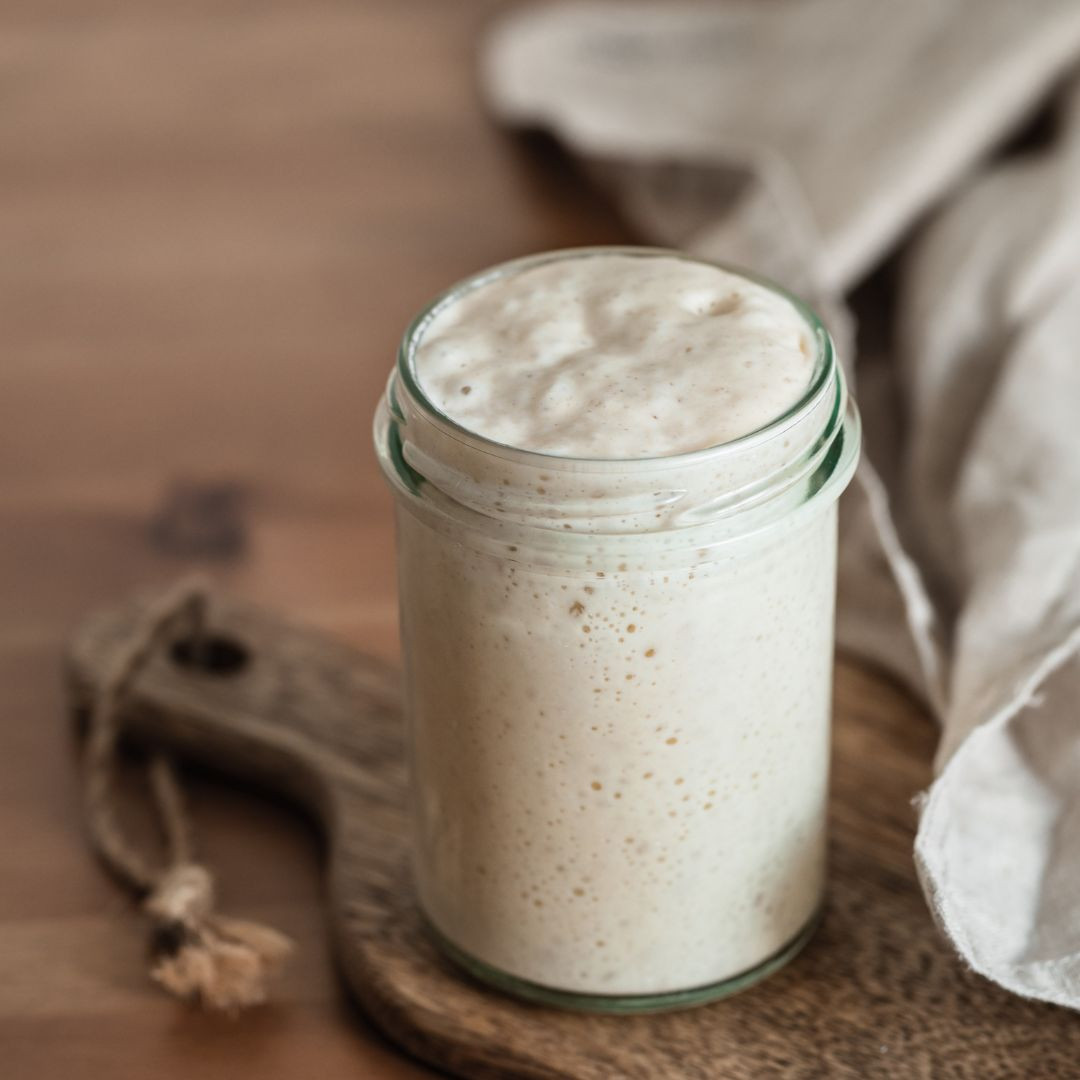
Starting a sourdough starter can be boosted along with a dehydrated starter. This acts as an inoculant to help the correct bacteria and yeasts to develop. Below are the instructions on how to rehydrate, build and grow your dehydrated sourdough starter.
You’ll need:
- Dried Starter
- Brown Rice Flour*
- Gluten-free Oat Flour*
- Filtered Water
- Basic Kitchen Scale
- Spatula
- Mason Jar or glass container with loose lid
- Optional: Cheesecloth + rubber band (lid for jar)
*I use fresh ground brown rice and oats from Azure Standard. I have the grains pre-mixed 50/50 and grind it fresh through my KoMo mill.
Day 1: Rehydrate Your Starter
Your packet contains 10 grams of starter. You can choose to use 5g or 10 g to get started. If using 5g, set aside the remaining 5g in a cool & dry place.
Add 5g of your dried starter to a glass mason jar - pint size works well to start. After your starter is established, you can move to a bigger jar. Mine now lives in a glass crock from my great grandma.
Add 25g of lukewarm filtered water to you starter - let sit to rehydrate.
After 5 minutes, stir in 10g of brown rice flour and 10g of oat flour. Stir with spatula until well mixed. Scrape down the sides of the jar.
Cover with cheesecloth & rubber band. Set aside at room temperature.
Fun thing: Give your starter a name.
Day 2: Feeding your Starter
Your starter will look smooth with minimal or no bubbles the first couple days, this is normal.
No need to discard yet. Add 12.5g brown rice flour, 12.5g oat flour, and 25-30g lukewarm filtered water. Stir with spatula to combine and scrap the sides down. You want the consistency to look more like pancake batter. Cover and set aside at room temperature.
Day 3: Feeding your Starter
You may or may not notice a few bubbles on the surface.
No need to discard yet. Add 12.5g brown rice flour, 12.5g oat flour, and 25-30g lukewarm filtered water. Stir with spatula to combine and scrap the sides down.
Day 4: Feeding your Starter
You may or may not notice a few bubbles on the surface.
No need to discard yet. Add 12.5g brown rice flour, 12.5g oat flour, and 25-30g lukewarm filtered water. Stir with spatula to combine and scrap the sides down.
During the next 24 hours, your starter may start to rise. Just for fun, mark the level of the starter on the side of the jar after mixing and watch how much it rises. Use a washable glass marker or a rubber band around the jar to mark it.
Day 5: Feeding your Starter
Today we’re doing a bigger feed. The growing sourdough starter should smell really nice by now, like sourdough and yeast -similar to a brewery or bakery. That is an excellent sign she is getting stronger and can handle more food.
NOTE: I you didn’t see much rise, consider adjusting the consistency. If it is too runny, it won’t rise well. Different types/brands of flour, humidity levels, etc. can lead to some variation between our starter consistency and your own. For example, sorghum flour is very dense and holds more water. If yours is on the more liquidy side reduce the water by 5-10g to start.
Discard some starter. Remove all but 50g of the starter - you can use the discard in pancakes, muffins or to make crackers
Add 25g brown rice flour, 25g oat flour, and 50g of lukewarm water. stir with spatula to combine. Scrape down sides & cover. Note the level of the starter on the side of the container and set it aside.
Continue with Maintenance Feedings
Moving forward, repeat step 5 and continue with daily feedings for the most active starter. This is best when you are making loaves of bread on a regular basis.
Or you can switch to maintenance feedings 2-4x per week if you’re not using your starter often or going on vacation. Simply store your starter in the refrigerator. When you’re ready to use it again, bring it out to warm up to room temperature and resume feeding.
Once your starter is established, feed her once a week for maintenance and keep her in the fridge between works. Allow the starter to come up to room temperature before discarding and feeding. This is my summer routine.
If you want to change flour, do so over 3-5 feedings, mixing the old and new flour together. Otherwise, the sourdough will fall flat for a while until it rebuilds itself. I accidentally did this when I ran out sorghum flour and had to suddenly switch flours. It took several batches before she was bubbly again.
Ready to Make Bread?
When your starter doubles in volume, you’re ready to make bread.
This may happen between days 5-14. You can speed this along by placing the starter in the oven with only the light on for ambient heat. It may double in 3-4 hours
Feeding for Making Bread:
Prior to making bread, you may want to do 1-2 larger feedings depending on the volume of your starter. You can feed twice in a 12–24-hour period to increase activity if needed.
Add 50g brown rice flour, 50g oat flour, & 100g lukewarm filtered water.
How To Build Levain
First, feed your starter 1-2x in the 24 hours before making this recipe to ensure it’s good and active. You’ll know your starter is ready to use when it doubles in size. You can then do one of two options
- If you want to use the starter right from your jar, do a big feeding of 75g gluten free flour of choice & 75g warm filtered water. This ensures you have at lease 150g of starter available with some left over. Allow to rise/double before making the recipe.
- Or build a levain/preferment: Building a Levain (also called a pre-ferment) helps determine how sour your bread will be, and also makes it easy to have the amount of starter needed for your recipe to add when needed.
-
- The amount needed will vary recipe to recipe, so see how many grams of active starter is needed.
- For the Classic GF Loaf recipe below, you’ll need 150g of active starter.
- In a second jar or bowl, add 50g of the fed & active sourdough starter, 50g GF flour, and 50g warm filtered water. Allow rise /double before using in recipe.
Wanting a community to lean into? Join the FREE Thriving Through Farm Distress: Wife’s Support Network! In our community, we embrace the challenges of farm life and provide a supportive space for wives facing the complexities of managing a family farm. Whether you're navigating financial pressures, day-to-day operations, or seeking ways to create a thriving home, we're here for you. Explore gardening tips for cultivating your own oasis, share insights on animal care, and discover practical family budgeting strategies. Together, let's grow through challenges, flourish authentically, and sow the seeds for a resilient and thriving farm life. Join us on this journey of resilience and abundance!
As I've grown in my journey as an entrepreneur, mom, gardener, and livestock owner, I struggled to find a planner that met my needs and kept me organized. So, I MADE MY OWN. You can look at it on the link below and buy it on amazon below.
Don't want the whole calendar part? I got you! I pulled the gardening and animal care pages out and put them in a book all their own.
Starting to garden doesn't have to be hard! I gathered all the tips I've learned over my gardening learning curve and made them into a simple course to jump start your gardening your life.
Supporting Your Family Naturally from the Inside Out community!! This community is for Mommas, looking to Support Your Family from Nature for Wellness. Tips range from nutrition, herbals, detoxing, natural cleaning, and essential oils. Basically, all the things I’ve learned slowly over the past 5+ years of my journey. We have moved off Facebook, to better serve our community and be able to discuss openly options for providing for your family in the best way possible.
Join the FREE Community
Join the FREE Community
I've had 3 very different pregnancies. After the first traumatic birth, I learned better and how to care for my body naturally and prevent common pregnancy and birth problems before they arise. This quick course will get you the tools you need to have a naturally healthy pregnancy, labor, and delivery. My first pregnancy I had a normal western medicine all the things pregnancy. My second? I flipped to completely natural, no medicine. Bonus: Preventing Preeclampsia Without the Aspirin & Healing from Birth Trauma


0 Comments